Tokens and tribulations
After fifteen years looking from afar at the evolution of the Brazilian Public Key Infrastructure – ICP Brasil, I have, at last, acquired my own certificate. And, with it, a hardware token to store the private key. I have decided, then, to try and install and use it in an Ubuntu 18.04.2 LTS operating system while documenting the steps in order to help other people that may want to use it in the same system and might face difficulties.
Installing the usb token for digital certificates
In order to install the GD Starsign token drivers from Giesecke & Devrient GmbH on Ubuntu 18.04.2 LTS, download the drivers from the drivers page from GD South America and unpack the files. Even though the driver name indicates it is supposed to be for a device named “Safesign”, they are compatible with the model “Starsign”.
Install the package’s dependencies with the command:
$ sudo apt install libccid pcscd libpcsclite1
The missing package
The drivers have an additional dependency which is not available on Ubuntu
18.04 LTS: the libgdbm3 package. However, if you try to install it, the
following happens:
$ sudo apt install libgdbm3
Reading package list... Done
Building dependency tree
Reading state information... Done
The package libgdbm3 is not available, but is referenced to by another package.
This may mean that the package is missing, has been obsoleted or
is only available from another source

E: The package 'libgdbm3' has no installation candidate
That happens because this package is not available on Ubuntu 18.04 LTS “Bionic Beaver”. However it was available in a previous LTS version, 16.04 Xenial, which has version 1.8.3-13.1 of libgdbm3, and also on Debian 9 (Stretch), which has version 1.8.3-14 of the package. Since Ubuntu is based on Debian, the Debian package works on Ubuntu, too. So it’s a personal choice on which one of those to install. Since Debian has the more recent version, I opted for that one.
To install the package, just download it from the respective link and execute the command:
$ sudo dpkg -i libgdbm3_1.8.3-14_amd64.deb
Selecting previously unselected package libgdbm3:amd64.
(Reading database ... 293686 files and directories currently installed.)
Preparing to unpack libgdbm3_1.8.3-14_amd64.deb ...
Unpacking libgdbm3:amd64 (1.8.3-14) ...
Configuring libgdbm3:amd64 (1.8.3-14) ...
Processing triggers for libc-bin (2.27-3ubuntu1) ...
Security
The problem with the approach of installing individual packages in this way is
that, as it is not managed by apt or another package manager, if a
vulnerability is discovered on it, the correction will not be automatically
updated. The user is unlikely to manually update the package, as it is not
practical.
Considering we are talking about using an USB token with a digital certificate to sign legally binding documents, this problem becomes even more critical. We can only hope that, in the future, Giesecke & Devrient GmbH will offer a driver without a non-managed dependency as it is today.
When I contacted a representative of G+D Mobile Security, a subsidiary of Giesecke & Devrient GmbH, when questioned about the problem, I was informed that they would request the supplier for a position about updated drivers. If I receive a more conclusive answer in the future, I shall update this post.
Installing the driver
With the dependencies solved, it is time to install the driver we downloaded on
the first step. Here the same observations I made about the dependency
libgdbm3 are warranted: the installation of an isolated package is not
managed to receive updates. It would be better if G+D Mobile Security would
offer a PPA repository for Ubuntu, so that the driver could be updated by the
same process that updates the operating system.
Actually, the ideal would be that the driver would be open source and would be available directly in the repositories of Debian, Ubuntu, CentOS and the most used Linux distributions. But, as we know, many hardware companies have the mindset that they must hide their drivers’ source code, in fear that competing manufacturers copy or reverse engineer their devices.
In order to install the proprietary driver for GD Starsign, after unpacking the downloaded file, run:
$ sudo dpkg -i SafeSign\ IC\ Standard\ Linux\ 3.5.0.0-AET.000\ ub1604\ x86_64.deb
Selecting previously unselected package safesignidentityclient.
(Reading database ... 293694 files and directories currently installed.)
Preparing to unpack SafeSign IC Standard Linux 3.5.0.0-AET.000 ub1604 x86_64.deb ...
Unpacking safesignidentityclient (3.5.0.0-AET.000) ...
Configuring safesignidentityclient (3.5.0.0-AET.000) ...
Processing 'triggers' for libc-bin (2.27-3ubuntu1) ...
Processing 'triggers' for hicolor-icon-theme (0.17-2) ...
Processing 'triggers' for desktop-file-utils (0.23-1ubuntu3.18.04.2) ...
Processing 'triggers' for gnome-menus (3.13.3-11ubuntu1.1) ...
Processing 'triggers' for mime-support (3.60ubuntu1) ...
Processing 'triggers' for bamfdaemon (0.5.3+18.04.20180207.2-0ubuntu1) ...
Rebuilding /usr/share/applications/bamf-2.index...
Processing 'triggers' for man-db (2.8.3-2ubuntu0.1) ...
Testing the token
In order to test the token, insert it in the USB port and use the following. If you see the device name, it means the installation has been successful.
$ pcsc_scan
PC/SC device scanner
V 1.5.2 (c) 2001-2017, Ludovic Rousseau <ludov...@free.fr>
Using reader plug'n play mechanism
Scanning present readers...
0: Giesecke & Devrient GmbH StarSign Crypto USB Token (00000000000000) 00 00
Configuring applications
The next step is configuring the certificate so that it works in the main applications in which you might want to use digital signatures or authenticate access with a digital certificate. Let’s do this in Firefox, LibreOffice and SEI (a electronic case file tool very often used in government bodies in Brazil.
Mozilla Firefox
In Firefox (for reference, we are using version 67), open the sandwich menu
and select preferences. Alternatively, you can type about:preferences in the
address bar. Select the menu “Privacy and Security” on the left column. The
token configuration is in the last option “security devices”.
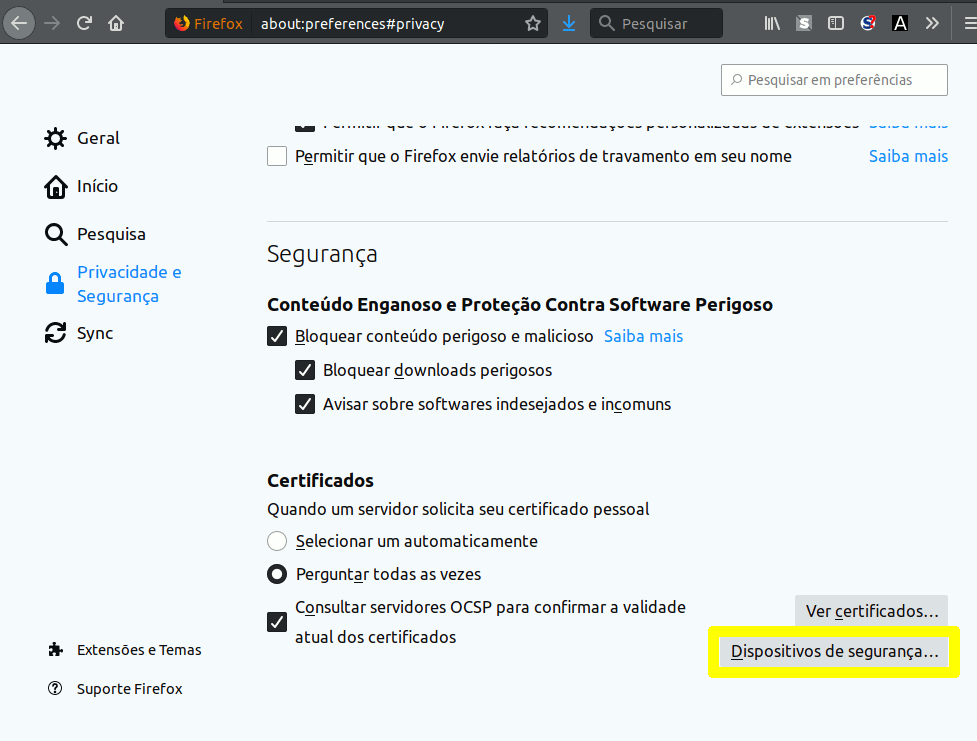
Following that, click the button “load”. In the field “module name”, put any
description you want. In the example, we’ve used “Token USB PKCS#11”.
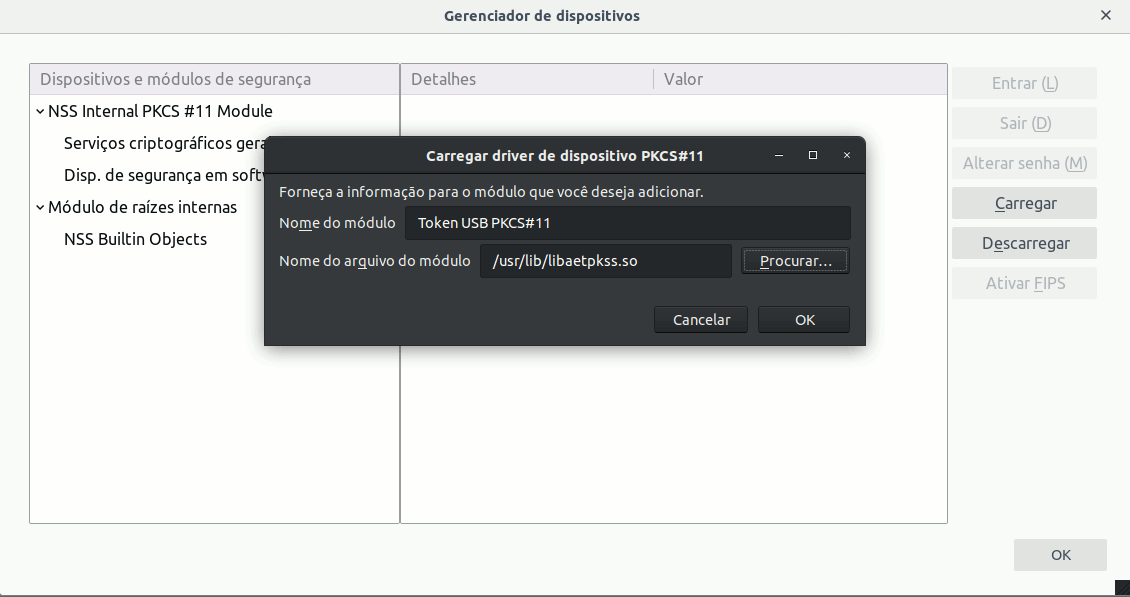
In the module filename, type (or select through the button “browse”)
the file /usr/lib/libaetpkss.so. If the token has been correctly installed
in the previous steps, this file should be present.
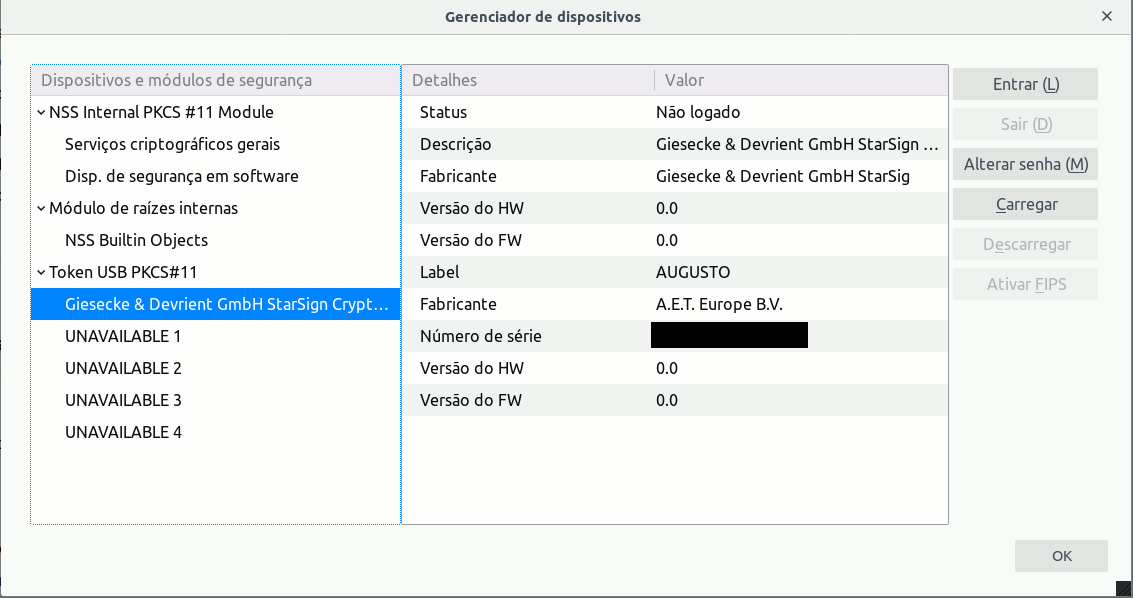
If everything goes correctly, Firefox’s device manager will show the newly added module and all devices (tokens) that are connected at the moment. In this case, we select the Giesecke & Devrient GmbH StarSign Crypto USB Token and can see the information on model name, manufacturer, token label, serial number, etc.
Now it can already be used to access sites that require authentication with a digital certificate. For example, if your certificate is from the Brazilian Public Key Infrastructure – ICP Brasil, it can be used to get information on your tax declarations in the Brazilian Revenue Service’s website.
LibreOffice
LibreOffice offers the possibility to digitally sign documents. Fortunately, it can read Firefox’s configurations. Then, if you have made the configuration in the previous step, it is a simple matter to use the digital certificate in LibreOffice too.
Select the option “options” in the menu “tools”. Alternatively use the
keyboard shortcut ALT+F12.
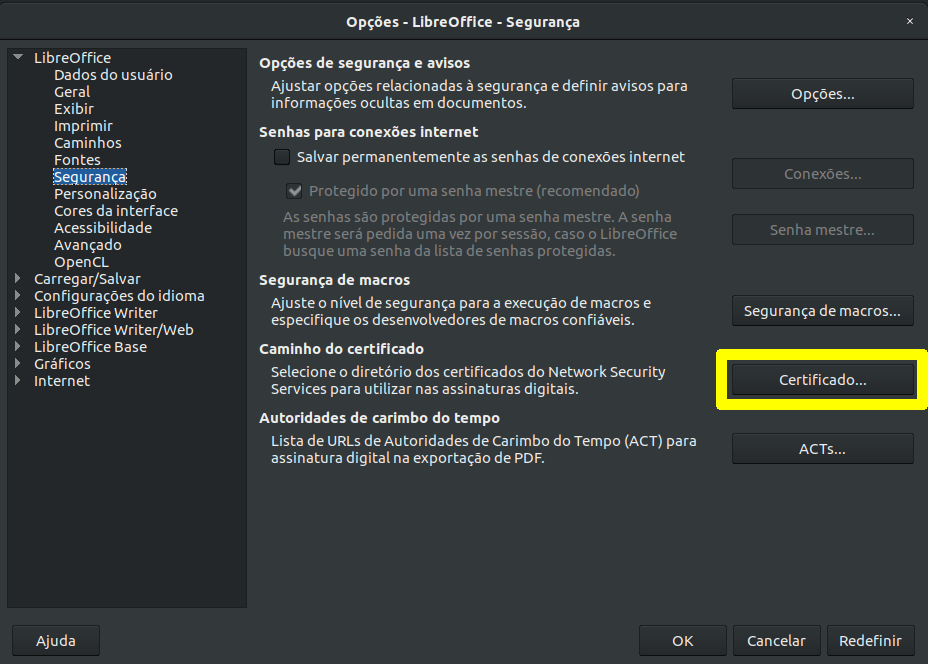
In the main configuration section (the first one, named “LibreOffice”), choose “security”. In the “certificate path” section, click the button “certificate…”. Select the option to use the Firefox paths and click “ok”. LibreOffice will ask to be restarted. Accept it. Note.: even if you click “restart now”, at least in the version I’m using (6.0.7.3), it does not restart. In that case, restart it manually by closing all LibreOffice windows that may be open (Writer, Calc, Impress, etc.).
From now on, under normal conditions, documents could already be signed. Before you sign, a document needs to be saved. To test it, create a new document for testing and save it, or open an existing document. Then use the “file” menu, “digital signatures”, “digital signatures”. Alternatively, it is also possible to get to the same dialog though the “file” menu, “properties”, “general”, “digital signatures”. From that screen, you can sign by clicking the “sign document” button, selecting the certificate from the list and clicking “sign”.
Exporting the certificate from the token
In case the certificate does not appear in the list, it will be necessary to import the certificate manually, so that it gets listed among the certificates recognized by the operating system for your user. First, export the certificate from the token. Insert the token and open the “tokenadmin” application from the Gnome Dash. This application should be present if the token driver has been correctly installed. In the application, the inserted token should appear under “reader or token name” and “token status” should be “operational”. Select the token with a double click. Under “token objects”, the certificate should appear. Click “see certificate”.
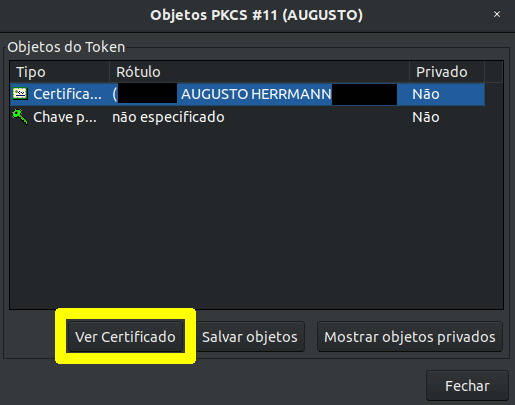
Click the button “save certificate”. Choose a location and name for the
certificate file with an extension .cer.
Importing the certificate in seahorse
The exporting of the certificate from the token is done. Now it’s time to
import the certificate in the operating system’s certificate manager.
In Ubuntu, the default installed application for that is Seahorse. You can
open it, if you’re still in LibreOffice, from the “start the certificate
manager” button, from the “digital signatures” screen. Or, alternatively, open
Seahorse directly by typing “Seahorse” ir “Passwords and keys” from the Gnome
Dash. Choose the “file” menu, “import…” and select the file with an
extension .cer, which was exported in the previous step.
The main data of the certificate will be shown (name, certificating authority, expiration date). Click the import button. From now on, the certificate should appear among the ones available for LibreOffice.
Bug in Ubuntu 18.04.2 LTS
Or so it should. At least, there are reports that in other GNU Linux distributions, or even in version 16.04 LTS of Ubuntu, it used to work. But the bug is present in both version 18.04 LTS as well as version 19.04 of Ubuntu, in addition to recent versions of Manjaro and Fedora.
The fact of the matter is that the “import” button is unavailable. When you hover the mouse over it, you get the message “cannot import because there are no compatible importers.
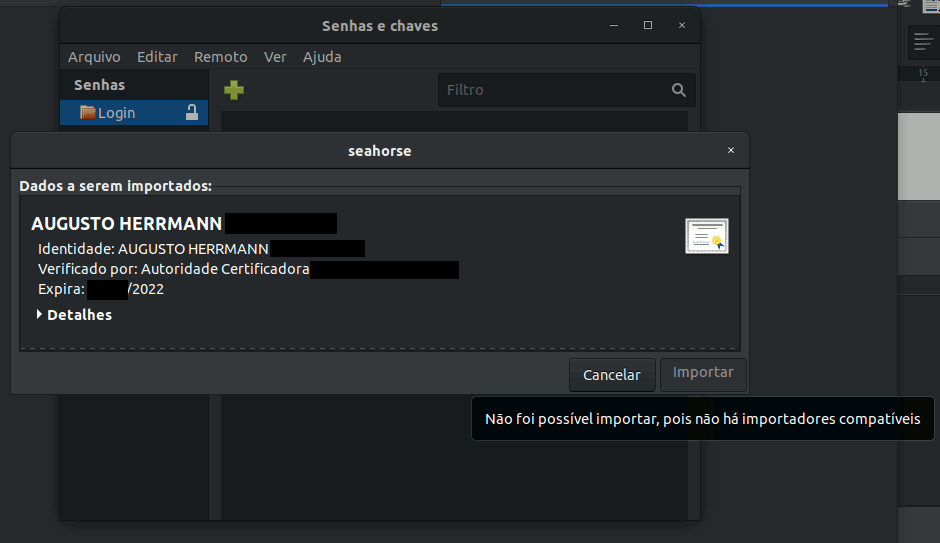
It appears the bug in Seahorse comes from a dependency named libgcr and it
also affects other applications that use it, such as Gnome Keyring. the
bug has been reported in
libgcr, but so far has not been solved.
For now, I could not find a workaround. There is still no way to sign documents with a digital certificate in LibreOffice, in Ubuntu 18.04 LTS and 19.04, as well as in a number of GNU Linux distributions that use the same dependencies.
Signing documents in SEI
Note: this section might not be of interest to non-Brazilian readers.
SEI, “Electronic System for Information” (the most undescriptive name in the history of software, given that any system, speaking in terms of software, is electronic and deals with information), is a system developed by the Regional Federal Court of the 4th Circuit – TRF4 to automate court filings, that until then worked in paper. Even though it is not free and open source software, and in fact the court keeps changes to the software’s source code under strict control, over the years it has been licensed for use by many institutions in public administration in Brazil, in all levels of government, to make administrative case files digital, which had been until then run in a physical medium: paper.
The case files are a set of official documents, which often must be signed by the stakeholder or for the author of an official act, as a way to guarantee its authorship and authenticity as a representation of a manifestation of intent of the signing party. In the transition to the digital medium, it becomes necessary to find a way to establish a guarantee similar to signing on paper. With that in mind, in 2001 the Brazilian Public Key Infrastructure – ICP Brasil was created, by the Temporary Order 2.200-2. It established a legal binding for digital signatures made with a certificate from ICP Brasil (article 1).
If you are asking yourself why would a Temporary Order (note: it is a legal instrument available to the president of Brazil that is supposed to be temporary until voted by congress in 120 days) from the year 2001 is in effect today, it is an order enacted before the change to the constitutional rules for enacting Temporary Orders brought by the Constitution Amendment no. 32, from 2001. It established, on article 2, a special rule for Temporary Orders which were in effect at the time:
Article 2. Temporary Orders enacted in a date preceding the publication of this amendment continue in effect until either a further Temporary Order explicitly revoke them or until definitive deliberation by National Congress.
Since then, National Congress has never moved itself to convert it into law, which brings us to this bizarre situation where, in this moment of digital transformation, both in the public and private sectors, a significant part of the legal infrastructure for it stands on a Temporary Order that will come of age this year, when it gets 18, without becoming definitive law.
Back to SEI, it allows users t sign documents electronically using either just their login password or a digital certificate. The signature using just a password is backed by just a Decree and, from a security viewpoint, is something very fragile, as someone that gets undue access to the database could change or forge any signature. That does not happen with digital signatures that use a digital certificate, which, as long as the cryptographic algorithms used are considered secure, can’t be forged. In addition to that, this type of digital signature is backed by MP 2.200-2, article 1, which has strength of law, to be legally binding as a signature.
So it is not hard to judge which of these types of signatures supported by SEI is preferable. There are various issues on usability, security, legal support and software project management, both in regard to SEI and ICP Brasil that warranted further discussion in a separate post. But here we shall concentrate on the practical questions on how to operate the digital certificate in this context.
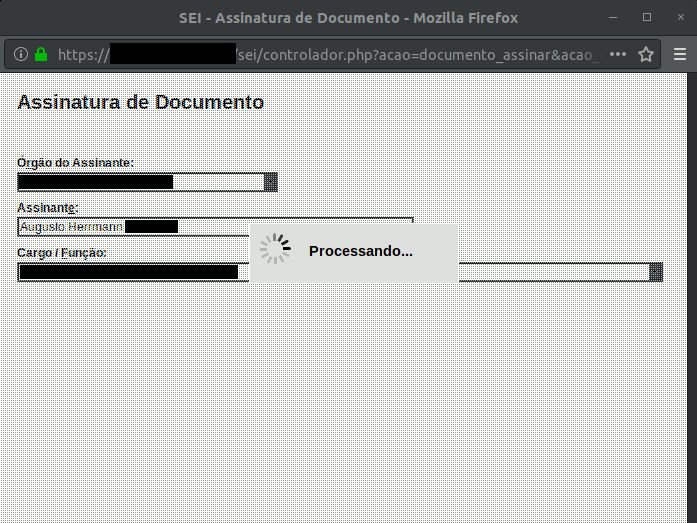
In theory, having the certificate installed, to use it, it would suffice to clock the “sign” option, in a SEI document, and then select the “digital certificate” option. However, when you do it in a SEI instance, I came across a screen with the message “processing”. And so it remains indefinitely. I do not know if it is a configuration problem on this particular SEI instance or if SEI’s support of digital certificates is faulty. What I know for sure is that the certificate is working correctly in the browser, something I could verify in other sites that allow access with a digital certificate.
As I get further information about fixes to these problems, I shall update this post.